
Learn how to join the Apple Developer program, submit an app and get published on the App Store!
You’re on your way to becoming a published iOS developer! In Part One, you went through the developer registration process, used the iOS Developer Center to register your devices, created certificates and profiles, and finally brought it all together by running the app on a physical device.
Now, in Part Two, you’ll use iTunes Connect to send Apple the information they need to pay you for your apps and, finally, you’ll submit your app to Apple for approval.
Getting Started
Before we actually get started you should know, rather than setting up the provisioning profiles manually as you did in Part One, there’s an easier way to get your apps running on your devices.
The truth is, in some situations — such as when working with more than one developer account — the automatic provisioning you’re about to see just doesn’t work. But here’s how to do it to save yourself time, when you can.
Open Xcode, if you haven’t already. For this tutorial, the screenshots and instructions are applicable for version 9.2, but should work for future Xcode versions as well.
Once in Xcode, open the Devices window (Shift-Command-2), plug in your iOS device and select it from the menu on the left. If this is the first time you’ve connected your device while Xcode is running, Xcode may take some time to sort itself out. You’ll see a message saying that it’s “processing symbol files.” Eventually, your screen should look something like this:

Now select Xcode\Preferences… (or Command-,) and choose Accounts:

Click + in the lower left, select Apple ID, and click Continue:
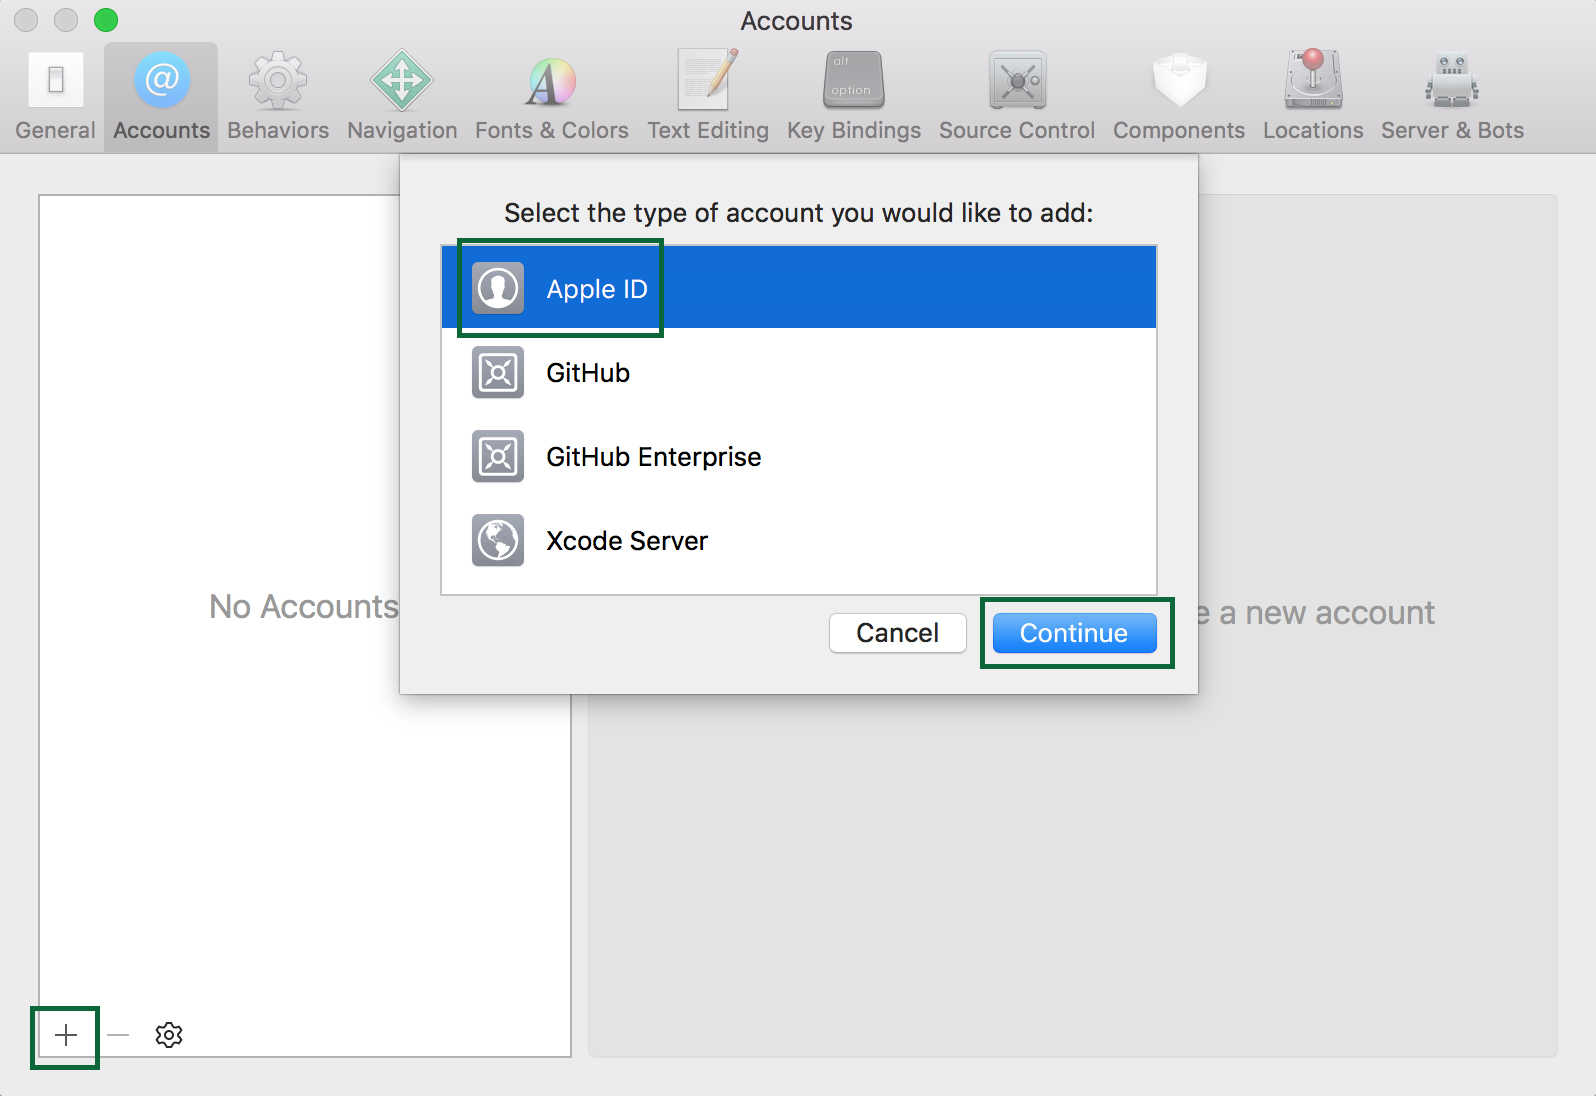
Enter your developer account credentials and click Sign In.
Entering your credentials this way allows Xcode to connect automatically to the Provisioning Portal on your behalf. It will also detect any connected devices and automatically register them with the Provisioning Portal if they aren’t there already.
Next you will see a screen that shows your information. Note that your role is Agent. This is the “super user” account and has the most permissions of any role. If your account is set up as a company or business — not an individual developer — you’ll have the ability to add other folks to your account. These other developers can have the role of Member or Admin.
At the bottom of the screen, you will see two buttons:
- Download Manual Profiles: downloads profiles that haven’t been added to Xcode yet.
- Manage Certificates: enables you to create additional certificates, similar to what you did via the Developer Portal in the previous part of this tutorial.
You can now close the preferences pane.
Remember that there will be times you’ll still need to know how to do this using the Provisioning Portal, so it’s a good thing you’ve seen how to do it the hard way first. Here are some situations in which you’ll need to know the old-school way:
- You’re working for a person or company that has their own account, and you need to use their account instead of your own.
- You need to test app services, such as Game Center, In-App Purchase, Data Protection, or iCloud. For these you need a provisioning profile with a bundle ID that does not use a Wildcard App ID. As you recall from the first part of this tutorial, Wildcard App IDs work with every app but do not allow you to test these services. In this case, you’ll need a provisioning profile with an Explicit App ID.
- You’re building a beta version of an app for someone’s device and you don’t have access to the device itself, just the UDID.
Running Your App On Your Device – Reminder
For this section of the tutorial, you need an app to test on your device. This tutorial uses the Drop Charge app from 2D iOS & tvOS Games by Tutorials.
In the previous part of this tutorial, you ran your app on a physical device. Now you’ll go into a bit more detail about how that works.
One of the things you did was open Project navigator, click on the project node of the tree, click General, and set Deployment Target at or below the iOS version on your device.
Deployment Target is a fancy way of saying “the minimum version of iOS that your code supports”. Be careful though! If, for example, you set the Deployment Target to iOS 8.0 but use an API that is only available on iOS 9, your app will crash! The safest thing to do is to test your code on a device running the oldest version of iOS you want to support.
Make sure the Bundle Identifier is the same as the bundle identifier you used for the App ID you registered in the Provisioning Portal:

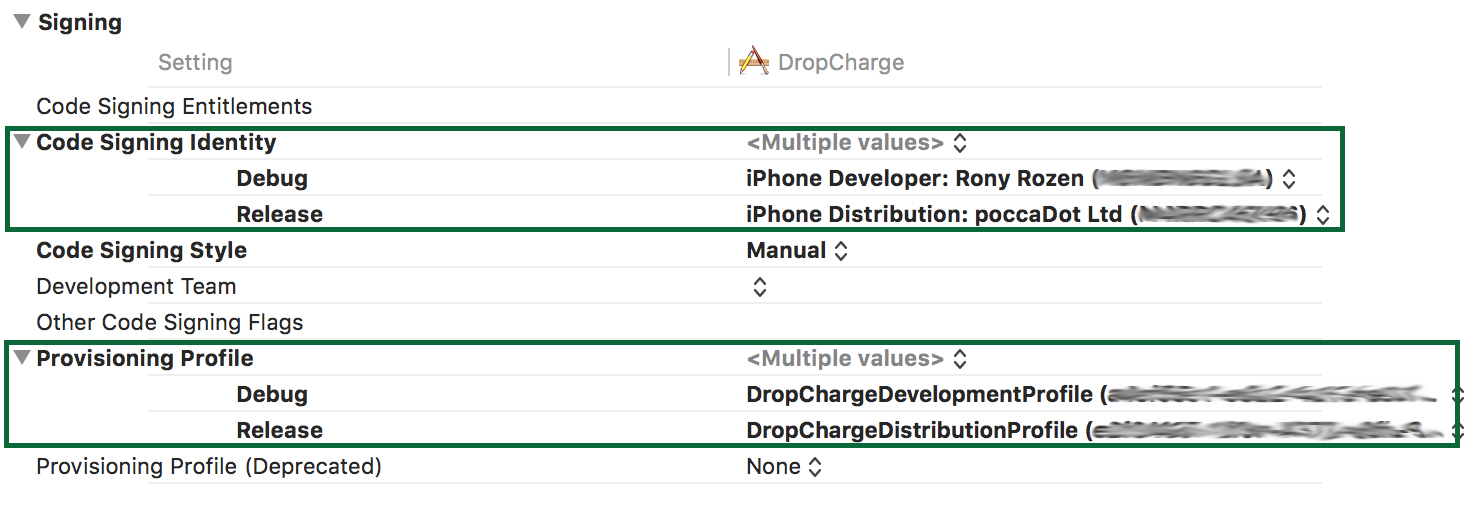
Next, you must point Xcode to the correct provisioning profiles. Click Build Settings and search for the word “signing”. In the search results list under the Code Signing Identity section, click the drop downs for the Debug and Release entries and choose the correct certificates. Then, under the Provisioning Profile section, choose the matching provisioning profiles from those presented by Xcode.
You should select your Developer Certificate & Profile for the Debug build, and your Distribution Certificate & Profile for the Release build:
Finally, make sure the device you want to run on is connected to your Mac, then choose that device using in scheme chooser on the top left.
Press Command-B to build the project. You may see a prompt saying “codesign wants to sign using key ‘privateKey’ in your keychain”. The Mac is letting you know Xcode wants to access your credentials. Enter your password and click Always Allow.
If there are any problems with your profiles, you’ll see something like this popup in Xcode:
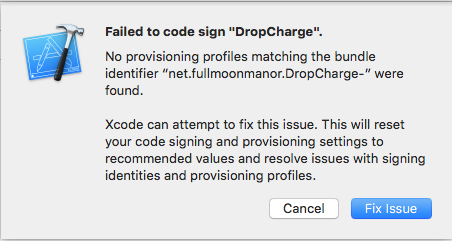
In this example, the Bundle ID had been accidentally mis-typed. Xcode will gladly go make you a new profile for you, but you do not want that so don’t click Fix Issue. Select Cancel instead and go back and correct the Bundle ID manually.
Press Command-B to build again. Now everything should be OK:
![]()
Press Command-R to run the app. In a few moments you should see your app running on your device! That’s always an exciting moment :]
Last Stop: iTunes Connect
Now it’s time to get to know iTunes Connect. Go to: https://developer.apple.com/membercenter and log in with your iOS Developer credentials.
Click iTunes Connect:

Note: You can also connect directly to iTunes Connect via the url: https://itunesconnect.apple.com
The first time you connect, you’ll see a brief introduction panel. You may wish to skip this in future:

Also, if it’s your first time, you’ll have to accept the Terms of Service.
You’ll now see the main iTunes Connect dashboard. There are many things to do here. This tutorial will show you the basic steps to get your app submitted, but if you want the gritty details, you can check out the complete iTunes Connect Developer Guide.
First things first: if you want to get paid for your apps, there’s some “paperwork” you must fill out. It’s better to get this stuff out of the way now. The process may vary a bit from country to country.
If all of your apps (or at least the first) will be free, you can skip this section and go right to Submitting Your App below.
If you’re still here, click Agreements, Tax and Banking:

The first time in, you’ll have to electronically sign one contract for paid applications that covers all terms of payment.
Click Request. On the next page, you’ll agree to Apple’s terms. You can also view the pricing matrix if you’d like. When you’re ready, select the checkbox and click Submit.
Contact Information
To set up your contact information, click the first Set Up button, under Contact Info. There, you can select Add New Contact. Add yourself as the new contact and click Save when done.
This tutorial assumes that you are an individual developer and have no employees. As such, you can give yourself all the roles. Change every drop down menu and click Done:

Bank Information
Now click Set Up under Bank Info. Since this is your first time here, you’ll have to click Add Bank Account.
Choose the appropriate Bank Country and click Next. If you choose anything other than United States, be aware that the steps from now on may be different.
Your bank’s ABA Routing number is located on your checks or statements. Enter the correct ABA Routing Number, and click Next.
Next, you must look for your bank’s branch. Look for one in your city but don’t expect to find an exact match for your branch. Don’t worry, it doesn’t have to be exact. Once you’ve made your selection, click Next.
Check the information and click Next.
Now comes the important piece: your account number. This is also found on your checks or statements. Fill out all the details for your account and click Next.
Confirm all the information, check the box indicating that it’s correct, and finally, click Save.
You can now select this new bank account and click Save. That wasn’t that bad, was it? :]
Tax Information
You’re almost done. At a minimum, you must complete the US tax forms. Under Tax Info, click Set Up.
You must complete the US form regardless of other forms you may also need to complete. Click Set Up under U.S. Tax Forms.
Fill out all the required information. If something is unclear, check out the W-9 instructions available for download from the upper-left corner of the page. Verify that everything is correct and click Submit.
Notice that the Status field in the Contracts In Process panel now says “Processing” – Apple is verifying the information you provided. This may take an hour or so to become active; you may even see a deposit in your account followed by a withdrawal of the same amount.
Once all your contracts have been verified, the Contracts in Process panel will disappear, and you’ll be left with the Contracts In Effect:

Click Done to go back to the main iTunes Connect Dashboard.
And now for the fun part!
Submitting Your App
To submit an app, there are certain items you’ll need to get in order before you can go any further. Make sure you have the following ready:
- Your app’s name.
- The app’s description.
- Your app’s icon, sized 1024 by 1024 pixels.
- Screenshots for all supported devices (more details about sizes can be found here).
Notes: Your images can be in JPEG or PNG format. At least one screenshot is required for each device your app supports (maximum 10 for each).
Once you’ve got all this assembled, click My Apps in iTunes Connect:

Click +, then select New App. The first time you attempt to submit a new app, you’ll need to provide your company name as you’d like it to appear on the App Store for all of your future apps. This is something that you have to do before you can move on and you cannot change this value in the future. So, you’d better put some thought into it… :] This value will appear right below the app name and will be clickable, so users can see all of your apps in one place. You can use your first and last name or you can come up with a cool company name (it doesn’t have to be a real legal entity) that no one has used before on the App Store.

Complete the form as follows:
- Platforms: Choose iOS.
- Name: enter the name of your app as it should appear on the App Store. Must be unique.
- Primary Language: select from the choices.
- Bundle ID: select the correct ID from the drop down of IDs you registered earlier.
- SKU: a unique ID for your app in the Apple system that is not seen by users. You can use letters, numbers, hyphens, periods, and underscores. The SKU must start with a letter or number.
Click Create:

Now the details screen appears:
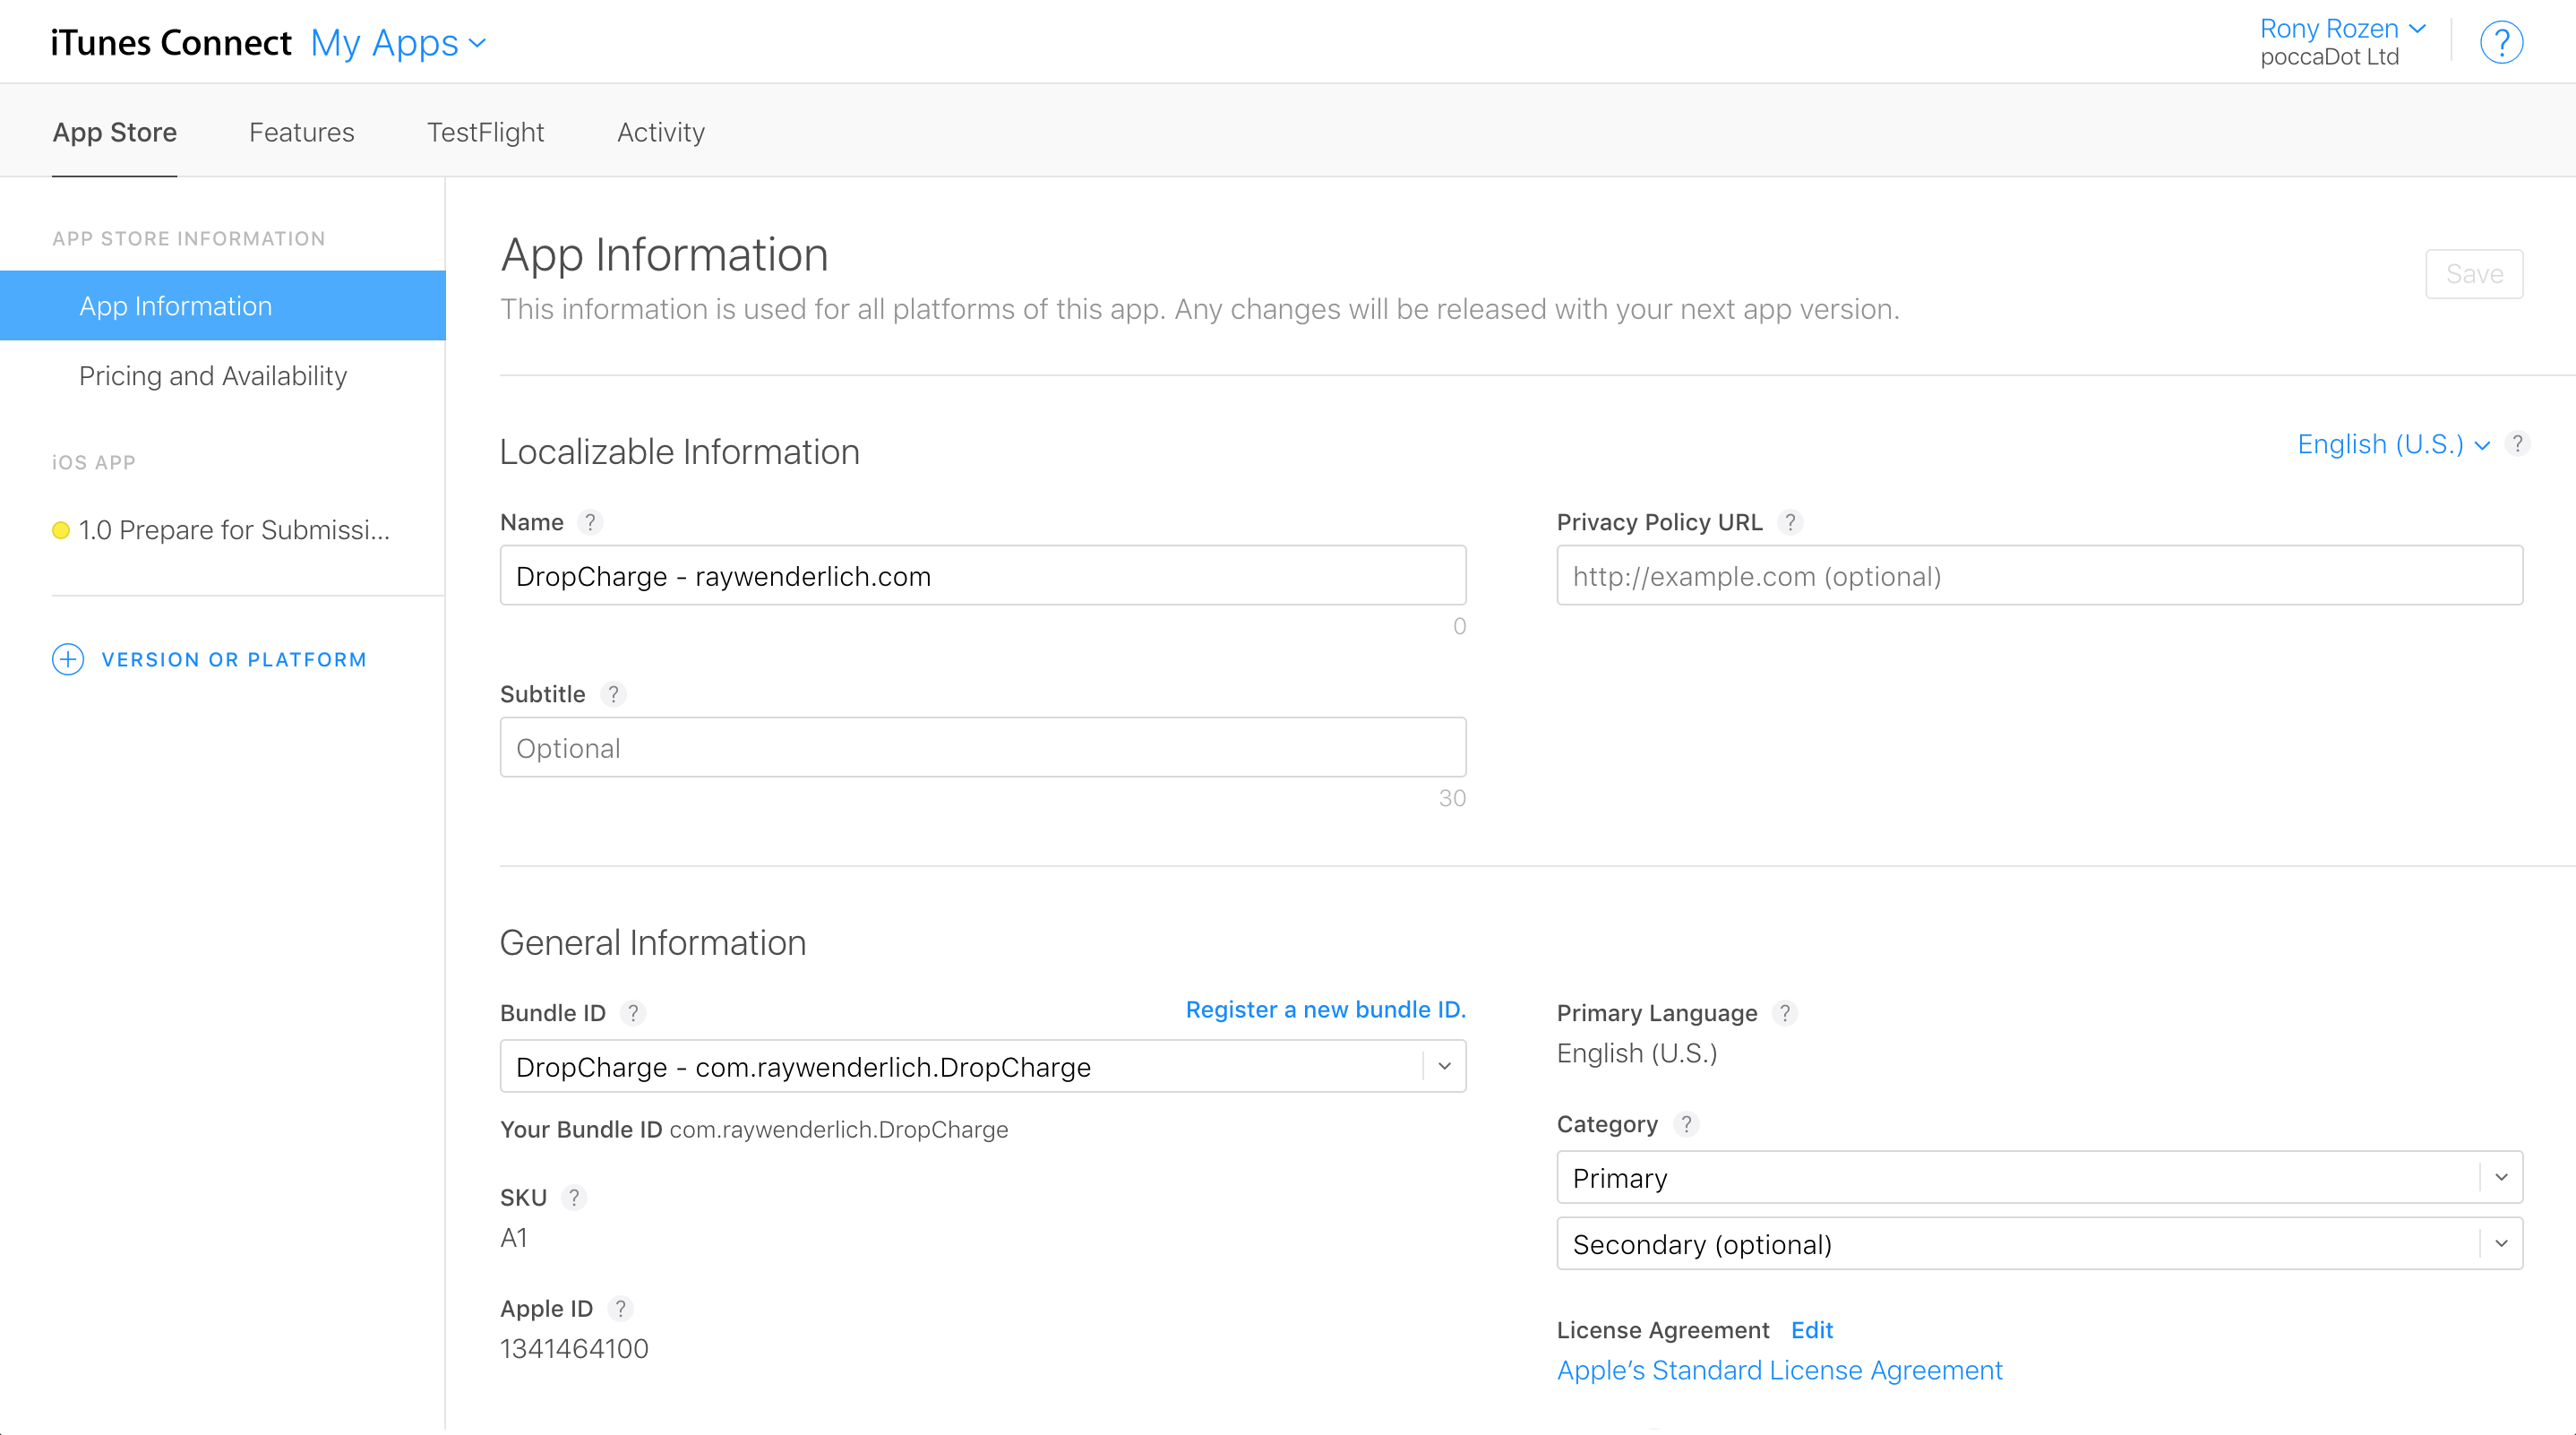
Click App Information. Fill out the Category fields based on your app information. If your app gathers data or your app is “Made for Kids” you must have a privacy policy posted — the Privacy Policy URL should contain the address for this. Scroll through the rest of the settings and set any that are appropriate for your app. Click Save.
Now click Pricing and Availability.
Select All Prices and Currencies for more information about the price tiers. Don’t forget that Apple takes 30% and you get 70% of the selected price. Now choose your desired price tier or indicate that your app will be free. You can specify different prices within different date ranges if you wish by selecting Plan a Price Change. For now, just add one entry. The Start Date will default to today; the End Date will be set to “No End Date”.
Click the radio button if you want your app to be offered at a discount to educational institutions when they purchase multiple copies at once. You can also offer your app to businesses at a discount for multiple purchases.
Once you’re done, click Save.
Click 1.0 Prepare for Submission:

This section is where you’ll add all the assets for your app that will appear on the App Store. The first step is to upload your app’s icon and at least one screenshot. If your app is universal, you’ll need to submit screenshots for the iPhone and for the iPad. When you have what you need, just drag and drop the screenshots over for each device type.
Click Save when you’ve added all the screenshots you need.
Scroll down and complete the the description — this is what the users will see in the app store — and keywords.
Consider the keywords; these are quite important. Only your app’s name and keywords are indexed in iTunes’ search engine, so brainstorm words that potential users might try to find your app or your competitors’ apps. You can only change keywords when submitting updates, so choose wisely.
Enter the URL for your website support page. It can be a simple page that allows users to email you if they want to compliment you on your great work :]
Skip the Build section for now and scroll down to General App Information. Add your icon — it must be 1024 by 1024 pixels.
Set the version number; it should be the same as in your app’s Xcode project. Future versions of this app that you’ll submit must have increasing version numbers. You can’t submit version 1.1 after you’ve already submitted version 1.2.
Also, speaking of future versions of your app, once a version is released, you cannot roll back to a previous version. You’ll have to submit a new version, wait for Apple to approve it, and release it to replace the version you’d like to replace. As long as you haven’t released the version, even if Apple has approved it, it won’t be available to your users.
Fill out a copyright notice, a contact email and affiliated websites.
Click Edit next to Rating. Enter the categories appropriate for your app. Be honest, as the reviewer can make changes to this section if they disagree. Click Done:

Scroll down to App Review Information. This section is designed to help the person at Apple who reviews and approves your app. Use the Notes area to provide information you want the reviewer to know. For example, if users need to sign up at a website or within the app in order to use it, provide some credentials here to make the reviewer’s job easier.
Also, if your app requires special hardware, ensure that you explain that here too, and try to have a way for the reviewer to use the app without the hardware. Complete the contact information so that the reviewer can reach you to discuss things if needed.
Finally, use the Version Release section to indicate when you want the app to be released. Since this is the first version, just leave the Automatically release this version option selected.
Now click Save.
The Submit for Review button on the top right will be enabled if there were no issues with what you entered.
If you try to click Submit for Review, you will get a message saying that there were one or more errors on the page — your app has not been uploaded yet!


Remember you skipped the Build section? Now you need to actually upload your app using Xcode.
Submit An App With Xcode
Your application should now be tested and ready to roll. All you need to do is submit to Apple for approval. This is surprisingly easy considering what you’ve been through already. It’s a good idea to take a moment and make yourself familiar with Apple’s most common rejection reasons to know what needs extra attention and what to avoid.
Go to Xcode and choose Generic iOS Device in the scheme chooser:

Then choose Product\Archive:

If everything is okay with the build, Xcode will open the Organizer window with your app in the Archives tab. You don’t really need to click Validate… here because this will be done when you submit anyway, and Xcode should have already validated against most problems. So save yourself some time and click Upload to App Store….
You will then be prompted with App Store distribution options. All checkboxes should be selected by default. Leave them like this and click Next:

The next screen asks you to select your distribution certificate and provisioning profiles. Select the ones you created earlier in this tutorial, and click Next. Finally, once Xcode is done doing some of its magic, you’ll be presented with a summary page of the app you’re about to submit. Click Upload.
Your app will start uploading to iTunes Connect. Various messages will be displayed as code is compiled, verified and code-signed. When the upload finishes, you should see the following message:

Just smile and click Done :]
You’re almost done; only a couple of steps remain. Switch back to iTunes Connect, scroll down to the Build area you skipped earlier and click Select a build before you submit your app. If you don’t see that option, refresh the page. If you still don’t see it, check your email. There may have been a problem with the binary you submitted to Apple.
Select the build Xcode just uploaded and click Done.
Click Save at the top right.
Finally, click Submit for Review.
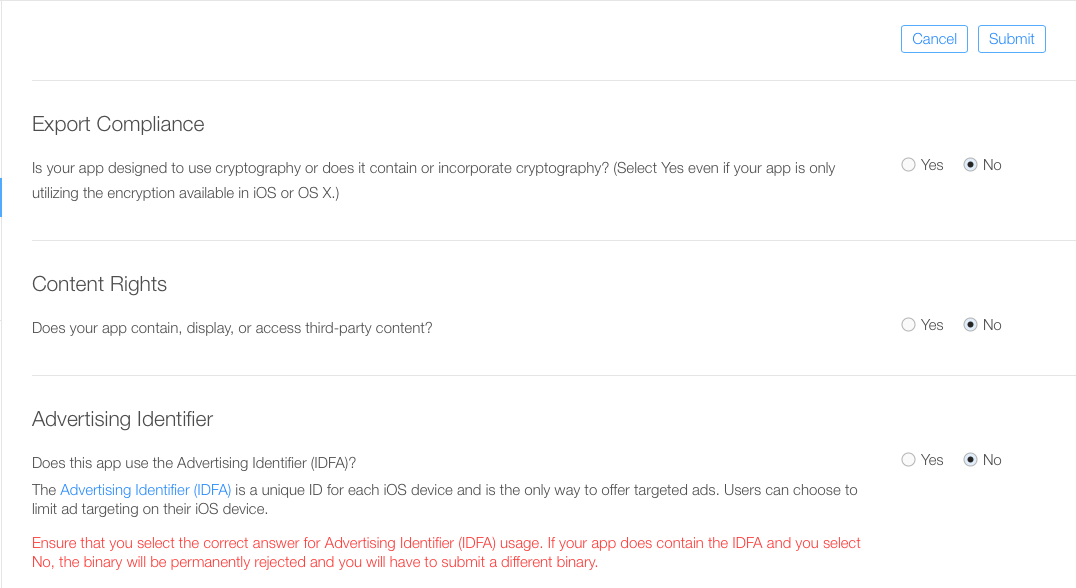
You’ll be asked several questions. Answer them honestly, then click Submit:
And you’re done! Can you believe it? You should receive a couple of emails from iTunes Connect telling you your app has been uploaded and is waiting for review. Your app’s status has also changed. It should now be Waiting For Review.
All you have to do now is wait for Apple to approve your app! You will receive emails about every change in your app’s status. Usually after a few days the status should change to “In Review,” then to “Approved.” Unless you chose a future release date, a few minutes after approval your app’s status will shift to “Processing For App Store,” then a few minutes later to “Ready For Sale.”
In iTunes Connect, you can click Activity on the top bar, followed by App Store Versions to see the status of your app throughout the process. The review time for your apps will vary based on traffic, but in general it takes around 5-10 days for most people.
If your app is not approved, Apple will email you with more information. They have become pretty good at specifying the exact problem and explaining how you can fix it. If this happens, just fix the problem and re-submit. If something is unclear, you can respond to their comments and your reviewer will usually reply in a timely manner.
Where To Go From Here?
If you’ve followed this tutorial on how to submit an app all the way, that was a long journey: from no account to an app on the App Store! You may not have an app ready to submit yet, but you should now feel confident about the submission and approval process once you do.
If you’ve submitted your first app while you were going through this tutorial, congratulations! Now go get ready for your next update or your next big app!
As mentioned earlier, there’s a whole lot more information available about the various aspects of iTunes Connect in the complete iTunes Connect Developer Guide.
If you have any questions or comments about what you’ve done, please join in the forum discussion below!
The post How to Submit An App to Apple: From No Account to App Store – Part 2 appeared first on Ray Wenderlich.
How to Submit An App to Apple: From No Account to App Store – Part 2 published first on https://medium.com/@koresol
