
Android and the Android SDK have improved a great deal over the years. We’ve received major API upgrades and additions. The UI has changed completely throughout the versions. However, some aspects of the SDK are still challenging, and can leave us with quite a headache.
An example headache is the Android application lifecycle. More often than not it follows the Uncertainty Principle. When you’re not paying attention, it works just like you want it to. But when you’re relying on it, it tends to work its own way. :[
Another issue, which goes along tightly with the lifecycle, is app architecture. Even though Android architecture changes faces about as often as Arya Stark does, the same issues usually remain. Namely, data flow problems, persistence, and stability. But how do you tackle these without complicating your code base?
Believe it or not, you’re now finally able to build a stable architecture in Android. It only took 9 years! And you don’t have to hack, complicate things, or build it yourself! You can do this by using the awesome Android Architecture Components framework from Google.
In this tutorial, you’ll dive into the vast world of Android Architecture Components, model your use case, and build an app to back it all up. In doing so, you’ll learn:
- Some of the primary Android Architecture Components and why they exist
- How to structure your app to conform to Model-View-ViewModel (MVVM)
- How to observe data in a safe way
Note: This Android Architecture Components overview assumes that you’re familiar with the basics of Android development and application structuring. If you’re new to Android, please check out our Beginner Android series and other Android tutorials.
Getting Started
In a little bit, you’ll download the starter project and dive into code. I know you’re hungry for some Kotlin, but you’ll understand the code and logic much better if you learn about the Android Architecture Components in theory first. :]
We’ll be covering Lifecycle, LiveData, and ViewModel, but leaving other Android Architecture Components such as Room for other tutorials.
Lifecycle: Cycling
Android Architecture Components encapsulate three major architectural aspects of app development. And they’ve made way for a new style of application structuring. Even more so, they address issues of stability, data persistence and flow in a very serious manner. With this in mind, we will likely see the quality of Android apps grow in the future like wildfire.
But enough talk: you’re due for an example! Let’s start off with one of the most important concepts, the Lifecycle.
You’ve more likely than not seen the lifecycle graph for activities and fragments. It’s a bit of a mess when you first look at it, isn’t it? Most bad things happen when we do something in the incorrect app state. If something like this popped into your head:
java.lang.IllegalStateException: Can not perform this action after onSaveInstanceState
then you know how frustrating it can be when you forget to unsubscribe a request. To make the Android world a little more crash-free, Google’s built Lifecycle.
It branches out to three concepts, Lifecycle LifecycleObserver, and LifecycleEvent. As a result, you can act on state changes from lifecycle you’re in by annotating methods. This means you can shoot out requests, and update the UI, knowing you’re in safe state.
You might say: “It seems pointless, why don’t I use onCreate or onStart to handle state?”. Well, the Android lifecycle is about as stable as a chair with two legs, so the callbacks don’t provide much safety. So for the most part you’re right, but in some cases callbacks aren’t either accessible or enough.
Have a look at the following example:
class MyLocationListener(private val lifecycle: Lifecycle) : LifecycleObserver {

  @OnLifecycleEvent(Lifecycle.Event.ON_START)
  fun start() {
    if (lifecycle.currentState.isAtLeast(Lifecycle.State.STARTED)) {
      // connect if not connected
    }
  }

  @OnLifecycleEvent(Lifecycle.Event.ON_STOP)
  fun stop() {
    // disconnect if connected
  }
}
Often we need user location updates. But if the user leaves our app, we should stop listening to save data and battery. In fact Lifecycle tells us when it’s safe to listen, and when it isn’t. Moreover, we don’t have to create custom listeners for onStart and onStop events.
To sum up, we’ve seen how this basic yet powerful concept can make our life easier. We’ve seen how easy it is to replace horrid listeners with a LifecycleObserver in our existing code. But we still haven’t addressed the issue of supplying data to the UI!
LiveData: It’s Aliiiiiive!
Continuing in the same spirit, look at another common scenario:
override fun onFailure(call: Call<BeersResponse>?, t: Throwable?) {
  view.hideLoading()
  view.showNoData()
  ...
}
This is a situation we often face, receiving an error from the backend. Of course, we need to handle errors, but how do we do this in a clean way?
In the case that we have a View that displays an error, it is crucial to have both show() and hide() methods for the error. Although this might seem OK, we’re adding methods to the View. Furthermore, the business logic layer shouldn’t know what the view can do and what happens on the UI.
Also, this makes you write a ton of boilerplate interfaces and method declarations for each screen. You know how painstaking that can be. But, once again, Architecture Components save the day. This time featuring LiveData!
What is LiveData made of? Other than sweets and magical essence, it’s basically just an Observable value that is also Lifecycle aware. Quite simple in it’s nature, yet very powerful. It is aware of the app state. So if you do go into background, but your response decides to arrive anyway, the data value is set, but not emitted. Once you’re back in the positive state of mind (read onStart) the data is sent, and the UI gets updated.
The main difference to the typical approach of requesting data from an API is that the UI subscribes to the data, and then knows what to do with it when it arrives. The business logic layer no longer imperatively says what to do.
Although it might seem that you’re moving logic from the business layer into the view, that’s not the case. In reality, all the view knows is that there is data to listen to. You’ll achieve it by subscribing this Lifecycle to a LiveData object.
Since our business logic doesn’t tell the UI what to do, we’ve achieved a nice separation of concerns. That will help us unit test our app. You’ll see how this separation is done later on in the sample project.
ViewModel: Modelling Gig
Luckily I’m not talking about fashion models, it’s not really my strong suit. The type of models we’ll be confronting are ViewModels!
In order to understand them we’ll go through an example in the sample project. For now, you need to know ViewModels are persistent throughout a Lifecycle scope. Meaning, if you create it in an Activity, as long as the Activity lives in the stack, so does the ViewModel. Knowing this, we can create a ViewModel in Activity scope, and use it in multiple Fragments, effectively sharing data between them.
Activities and fragments are owners of a Lifecycle, as they implement the LifecycleOwner interface. This means they can provide their instance of Lifecycle when asked.
Also, calling for ViewModel instances will always return the Lifecycle bound instance. They even persist through orientation changes! So, by combining LiveData with ViewModels, you have data persistence such as for the savedInstanceState. This will save you from tons of crashes!
You’ve survived my excruciatingly long introduction, way to go! :]
One Project to Implement Them All
In order to show you the full extent of Android Architecture Components, we’ve created a sample project. Also, we’ve found a real life example to make each component as clear as possible. Shall we begin?
Start off by downloading the sample starter project here. Open the project in Android Studio 3.0.1 or greater and build and run to make sure all is well:
Let’s go over the project structure, which you can see is modular by package. The api and interaction packages are part of the model layer, the connection to backend. The di package contains, well – the dependency injection setup! The rest should be pretty self explanatory, with ui containing Android specific files and models containing our data classes. We’ve also added all of the needed dependencies to Gradle and separated them a bit for better understanding.
You’re using Retrofit for network requests, Glide for image loading, and Dagger for dependency injection.
The model classes look as follows:
data class Beer(val name: String = "",
                val style: BeerStyle = BeerStyle(),
                val labels: BeerLabels = BeerLabels())

data class BeerLabels(val large: String = "",
                      val medium: String = "")

data class BeerStyle(val name: String = "")

data class BeerResponse(@SerializedName("data") val beers: List<Beer>,
                        val currentPage: Int)
The labels contain your beer images so you can see what you drink. You’ll also display the beer name, and a style. The beer response models the beer data coming back from the API.
The ViewHolders to display the beers are also prepared for you in the starter project, and they’re fairly simple:
class BeerHolder(itemView: View) : RecyclerView.ViewHolder(itemView) {

  fun showBeer(beer: Beer): Unit = with(itemView) {
    beerStyle.text = beer.style.name
    beerName.text = beer.name

    val mediumImage = beer.labels.medium
    val largeImage = beer.labels.large

    // load whichever image exists
    Glide.with(itemView).load(if (largeImage.isNotBlank()) {
      largeImage
    } else {
      mediumImage
    }).into(beerImage)
  }
}
Since we’re using Kotlin Android Extensions, we don’t have to manually initialize Views using findViewById.
Waiter, I’ll have a beer please :]
We’ve chosen the best sample app purpose we could: beer drinking! However, beers don’t magically appear in your hands (sadly). You must first create an application at the BreweryDB. Create a new account, if you haven’t got one already.

Go to the Developers page, and click “Start Developing Now”. Next, accept the license to sell your soul to the Beer Gods:

Finally, create an API key to use in your requests by clicking “Register A New App” and giving your app the name BottomsUp:

You should see your app now, with the API key:

It may take a day or two for BreweryDB to approve your app, so you’ll see a “Pending Activation” message on the app screen. Calls to the API won’t work until the app is approved.
Since our app is simple, you can store your new key at the end of AppConstants.kt:
const val API_KEY = "your-api-key"
If this were a production app, you’re advised you to keep the key in a safe environment.

Hitchhiking Through Components
While 42 may be the answer to what life is about, this app will be about a reactive, lifecycle aware structure. You’ve got a backend now, and most of the core setup, but you need to integrate the Architecture Components. With LiveData you will make the UI update on data changes. ViewModel will make the requests survive orientation changes. Additionally, you’ll safely execute requests in the proper app state thanks to Lifecycle.
You’ll start off by requesting beers from the backend API. Then you’ll supply the ViewModel‘s LiveData mini cooler with said beers. And last but not least, you’ll provide the view with a cold one from the ViewModel by letting it subscribe to LiveData changes.
Building your ViewModel
Start by creating a viewmodel package in the app root. Then create a BeersViewModel class, which extends ViewModel, in the package:
class BeersViewModel : ViewModel() {
}
Your ViewModel needs a reference to the BreweryInteractor prepared in the starter project. Do this by adding a lazily computed value named interactor, at the top of the class, provided by the AppComponent from the application subclass App:
private val interactor by lazy { App.component.breweryInteractor() }
Next, you need to request beers from the interactor. For now, add a method getBeers() to request the first page of beers, and add a callback in your ViewModel just under the variable declarations:
fun getBeers() {
  interactor.getBeers(1, beersCallback())
}

private fun beersCallback() = object : Callback<BeerResponse> {
  override fun onFailure(call: Call<BeerResponse>?, t: Throwable?) {
  }

  override fun onResponse(call: Call<BeerResponse>?, response: Response<BeerResponse>?) {
  }
}
When prompted to import classes such as Code or Response, be sure to use the Retrofit2 classes.
Now you have everything a ViewModel needs, except for LiveData (which you’ll add below)! :]
One last thing you need to do before you move on to LiveData is add the ViewModel to the top of BeersActivity.kt:
private val viewModel by lazy { getViewModel<BeersViewModel>() }
The sample project comes with a few neat extension functions that help to tidy up your code. So instead of calling ViewModelProviders.of(target).get(viewModelClass), here you instead call getViewModel().
You might have noticed how your DI is currently done by lazy values. This is not necessarily the best approach, but Dagger and ViewModels don’t work together out of the box. In order to create a ViewModel with Dagger, you have to declare a custom Factory, which is done by using mapped binding or subcomponents.
For the purposes of simplicity though, the project will use lazy values. You can check out Google’s sample app on Architecture Components to see the subcomponent approach. :]
A Time for Change (or Being Reactive)
Everything moves and changes fast. The key is being able to react to changes. You’re now going to use LiveData to do so. LiveDatas. Instead of complicating your apps with Observable, you can use a LiveData structure. Simple as that. :]
You’re moving to the final task of our little tutorial – adding the data. Think about what data you need. When we first talked about components, we had an example with loading and error states. This is something our app should handle. In case of an error, we need to tell the UI that loading should stop, and an error should be shown.
Start off by adding two LiveData properties to the top of your ViewModel:
val errorData = MutableLiveData<Boolean>()
val loadingData = MutableLiveData<Boolean>()
Updating their values in onFailure, like so:
override fun onFailure(call: Call<BeerResponse>?, t: Throwable?) {
  loadingData.value = false
  errorData.value = true
}
For the rest of the data, you need one to hold the page value, because you have lazy loading in the sample project. In addition to that, you need one to hold the list of Beers. Add them right after the loading and error ones:
val pageData = MutableLiveData<Int>()
val beerData = MutableLiveData<List<Beer>>()
Update their value from the response
override fun onResponse(call: Call<BeerResponse>?, response: Response<BeerResponse>?) {
  loadingData.value = false //data has come, stop the loading
  errorData.value = false

  response?.body()?.run {
    updateData(this)
  }
}
Add the updateData method to the bottom of the view model:
private fun updateData(data: BeerResponse) {
  pageData.value = data.currentPage + 1 // increment the page
  beerData.value = data.beers
}
All that you need to do now is wire up the view, and you’ll be ready to serve some brewskies! :]
Add a BeerAdapter under the ViewModel declaration in BeersActivity:
private val adapter = BeersAdapter()
Replace the single TextView in activity_beers.xml with the following:
<android.support.v4.widget.SwipeRefreshLayout
  android:id="@+id/pullToRefresh"
  android:layout_width="0dp"
  android:layout_height="0dp"
  app:layout_constraintTop_toTopOf="parent"
  app:layout_constraintBottom_toBottomOf="parent"
  app:layout_constraintStart_toStartOf="parent"
  app:layout_constraintEnd_toEndOf="parent">

  <android.support.v7.widget.RecyclerView
    android:id="@+id/beersList"
    android:layout_width="match_parent"
    android:layout_height="match_parent"
    android:scrollbars="vertical" />

</android.support.v4.widget.SwipeRefreshLayout>

<TextView
  android:id="@+id/errorView"
  android:layout_width="wrap_content"
  android:layout_height="wrap_content"
  android:text="Error getting beers!"
  app:layout_constraintBottom_toBottomOf="parent"
  app:layout_constraintLeft_toLeftOf="parent"
  app:layout_constraintRight_toRightOf="parent"
  app:layout_constraintTop_toTopOf="parent" />
Add the following private helper methods into BeersActivity, which in turn initialize the UI, handle the loading state, and handle possible error conditions:
private fun initializeUi() {
  beersList.layoutManager = GridLayoutManager(this, 2)
  beersList.itemAnimator = DefaultItemAnimator()
  beersList.adapter = adapter
}

private fun showLoading(isLoading: Boolean) {
  pullToRefresh.isRefreshing = isLoading
}

private fun setErrorVisibility(shouldShow: Boolean) {
  errorView.visibility = if (shouldShow) View.VISIBLE else View.GONE
  beersList.visibility = if (!shouldShow) View.VISIBLE else View.GONE
}
Now, call the initializeUI() helper in onCreate(), and make a call to the view model to get beers:
override fun onCreate(savedInstanceState: Bundle?) {
  super.onCreate(savedInstanceState)
  setContentView(R.layout.activity_beers)

  initializeUi()

  // add subscriptions

  viewModel.getBeers() // request the data for the first time
}
But wait you’re missing something! Where are those subscriptions to the view model LiveData? Replace the “// add subscriptions” comment in onCreate with the following:
viewModel.errorData.subscribe(this, this::setErrorVisibility)
viewModel.loadingData.subscribe(this, this::showLoading)
viewModel.pageData.subscribe(this, adapter::clearIfNeeded)
viewModel.beerData.subscribe(this, adapter::addItems)
These subscriptions add callbacks to the data changes in your LiveData. I’ll walk you through them one-by-one:
The errorData callback is the setErrorVisibility method:
)
private fun setErrorVisibility(shouldShow: Boolean) {
  errorView.visibility = if (shouldShow) View.VISIBLE else View.GONE
  beersList.visibility = if (!shouldShow) View.VISIBLE else View.GONE
}
When the shouldShow argument is true, an error is displayed, and the list is hidden for the moment. On the other hand, if the argument is false, the error is removed, and the list is displayed.
Next, the loadingData callback in showLoading just displays the loading state on true events and hides it on false ones.
Finally, the page and beers data govern what you will display by making calls into the BeerAdapter:
fun clearIfNeeded(page: Int) {
  if (page == 1) {
    beers.clear()
  }
}

fun addItems(newBeers: List<Beer>) {
  beers.addAll(newBeers.filter { beer ->
    beer.labels.medium.isNotBlank() || beer.labels.large.isNotBlank()
  })
  notifyDataSetChanged()
}
In case the user pulls to refresh, and resets the page to 1, you will clear the data before adding newly received items. Adding items is the standard adapter procedure. To implement pull-to-refresh, first update the BeersViewModel to modify the getBeers method and add onRefresh:
BeersViewModel.kt
fun getBeers() {
  interactor.getBeers(pageData.value ?: 1, beersCallback())
}

fun onRefresh() {
  pageData.value = 1
  getBeers()
}
Now add the following call at the end of initializeUi in BeersActivity:
private fun initializeUi() {
  ...
  pullToRefresh.setOnRefreshListener(viewModel::onRefresh)
}
To conclude, you see the input is the data from your ViewModel, whereas the output is the resulting UI changes. Now you should have everything you need to get the long awaited beers! :]
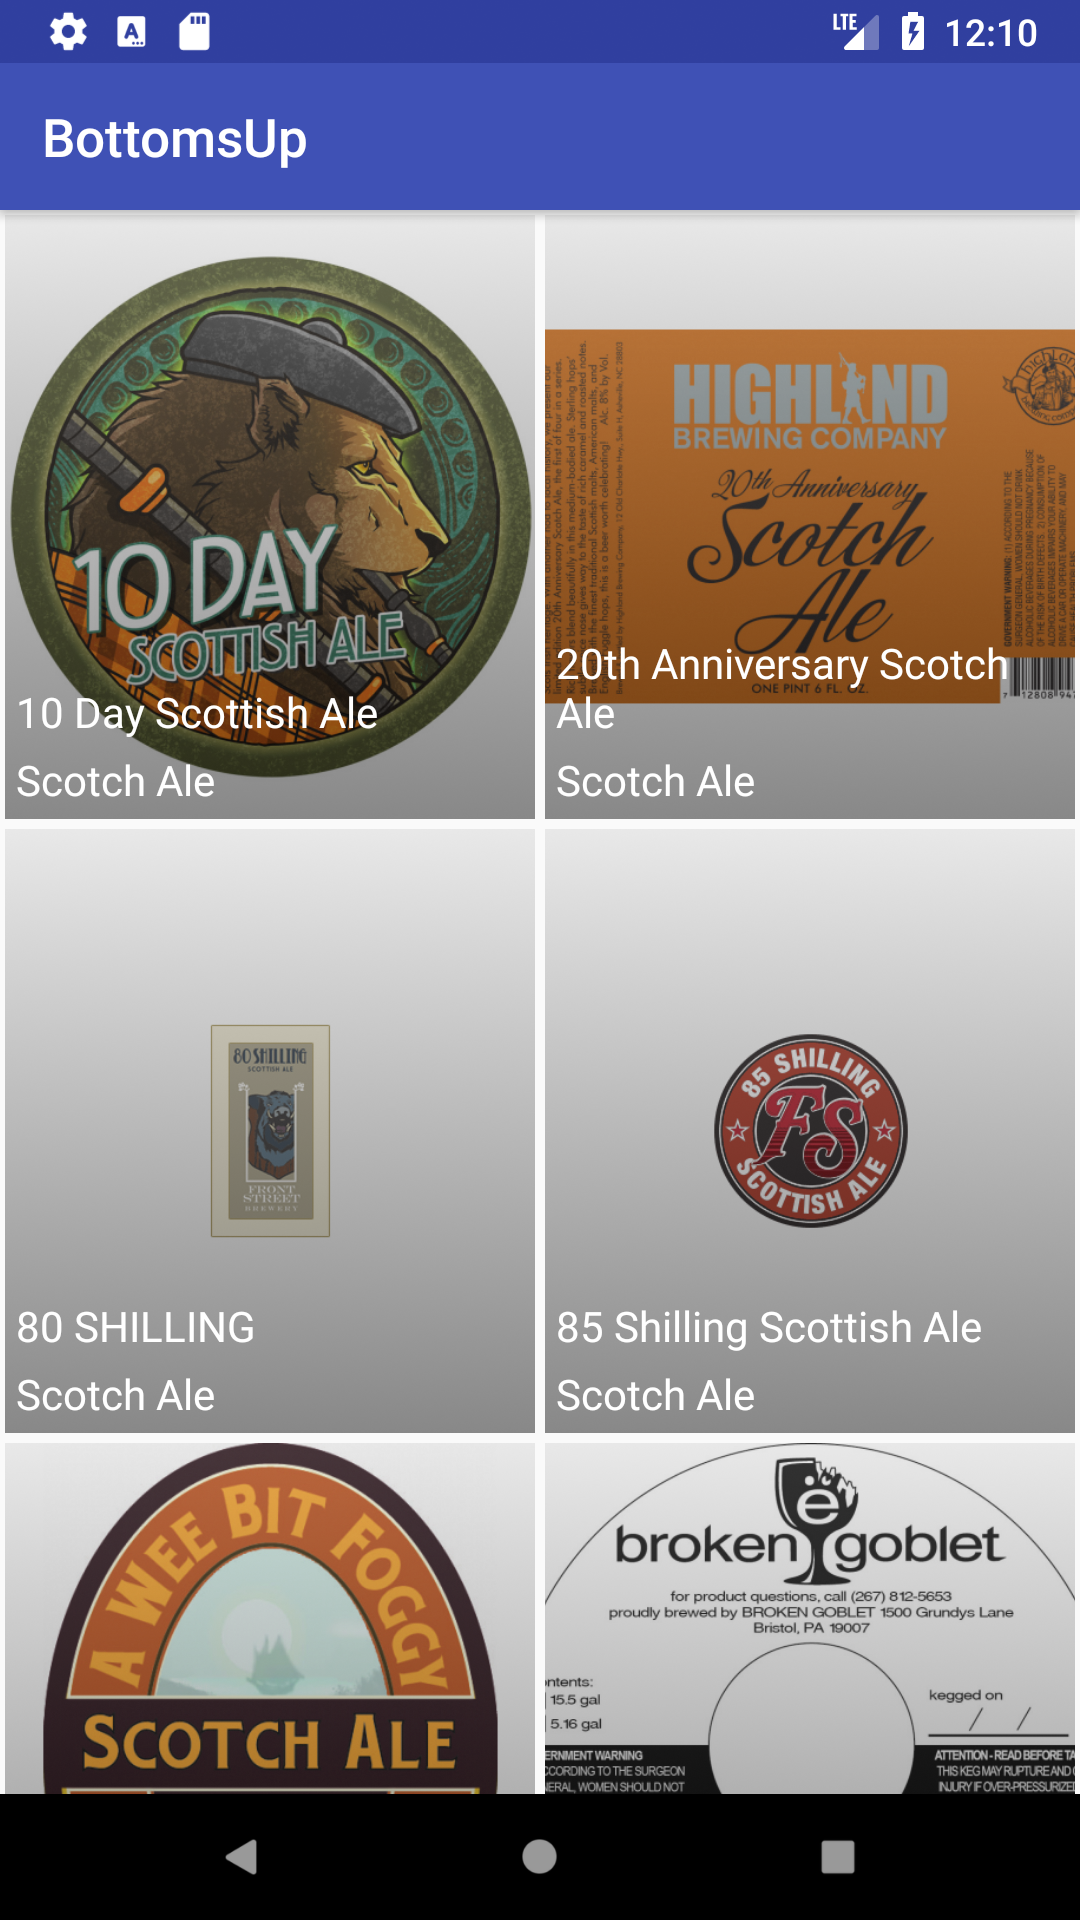
Run the app to get some beers. Everything should be working as planned (fingers crossed):
The implementation of infinite scroll to load the subsequent pages is not the focus of this tutorial. However, just call viewModel.getBeers() when you want to load a new page. The page increment has already been taken care of.
Reinventing the Wheel
You’ve used LiveData in this tutorial, but it’s quite the same as using Rx programming isn’t it? Well, not quite. While it follows the same core principle of the Observer pattern, LiveData has one huge advantage: it has a built in subscribe/unsubscribe system.
While Google encourages you to use whichever you prefer, they advise that by using Rx, you have to handle the unsubscribing yourself.
From what I’ve seen, Rx is very lightly used in most projects. So having a huge dependency just for passing data around from API requests is not my recommendation. Unless you’re doing Rx style operations like combining multiple requests, you’re better off with LiveData.
Where to Go From Here?
You can download the final project here.
There is a ton of materials on Android Architecture Components, since they’ve become one of the main things the Android community is actively researching and using. You can find a lot of articles out there, some of which are:
- Joe Birch’s series
- Google’s github, featuring a ton of sample apps
- My article depicting a nice way to handle errors
And of course be on the lookout for more of our tutorials on Android Architecture Components!
If you have any questions or comments, please join the discussion in the comments below.
The post Android Architecture Components: Getting Started appeared first on Ray Wenderlich.
Android Architecture Components: Getting Started published first on https://medium.com/@koresol
