
The Swift Algorithm Club is an open source project to implement popular algorithms and data structures in Swift.
Every month, the SAC team will feature a cool data structure or algorithm from the club in a tutorial on this site. If your want to learn more about algorithms and data structures, follow along with us!
In this tutorial, you’ll learn how to implement a Swift hash table. This data structure was first implemented by Matthijs Hollemans, and is now refactored for tutorial format.
Getting Started
As a Swift developer, you’re familiar with the Dictionary structure. If you’re also a Kotlin developer, you would be familiar with the HashMap class. The underlying data structure that powers both of these constructs is the hash table data structure.
The Swift dictionary is a collection of key-value pairs. Storing an value in a dictionary requires you to pass in a value with a key:
var dictionary: [String: String] = [:]

// add key-value pair
dictionary["firstName"] = "Steve"

// retrieve value for a key
dictionary["firstName"] // outputs "Steve"
Underneath the hood, the dictionary will pass the key-value pair to a hash table for storage. In this tutorial, you’ll learn about a basic implementation of the hash table and learn about its performance.
Hash Tables
A hash table is nothing more than an array. Initially, this array is empty. When you put a value into the hash table under a certain key, it uses that key to calculate an index in the array. Here is an example:
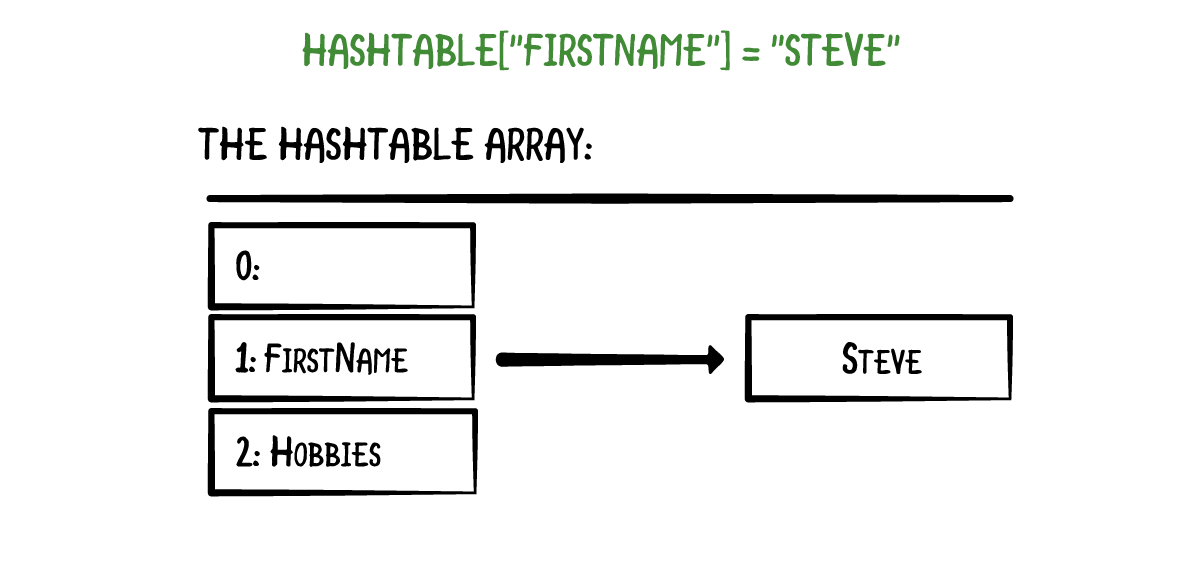
In this example, the key "firstName" is maps to array index 1.
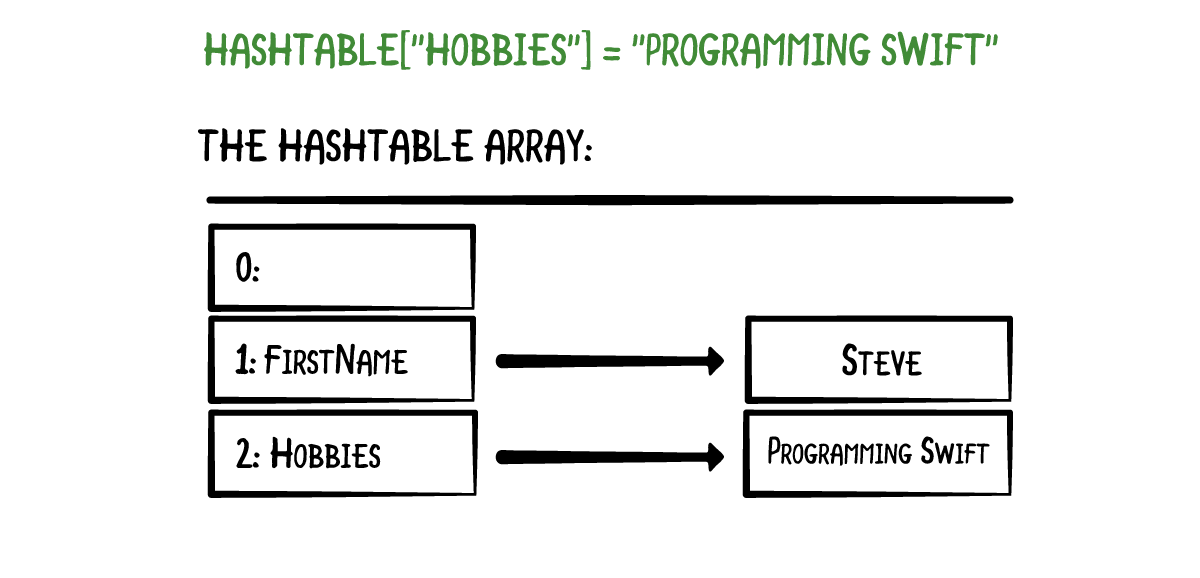
Adding a value under a different key puts it at another array index:
The trick is how the hash table calculates those array indices. That is where the hashing comes in. When you write the following statement,
hashTable["firstName"] = "Steve"
the hash table takes the key “firstName” and asks it for its hashValue property. Hence, keys must conform to the Hashable protocol.
Hash Functions
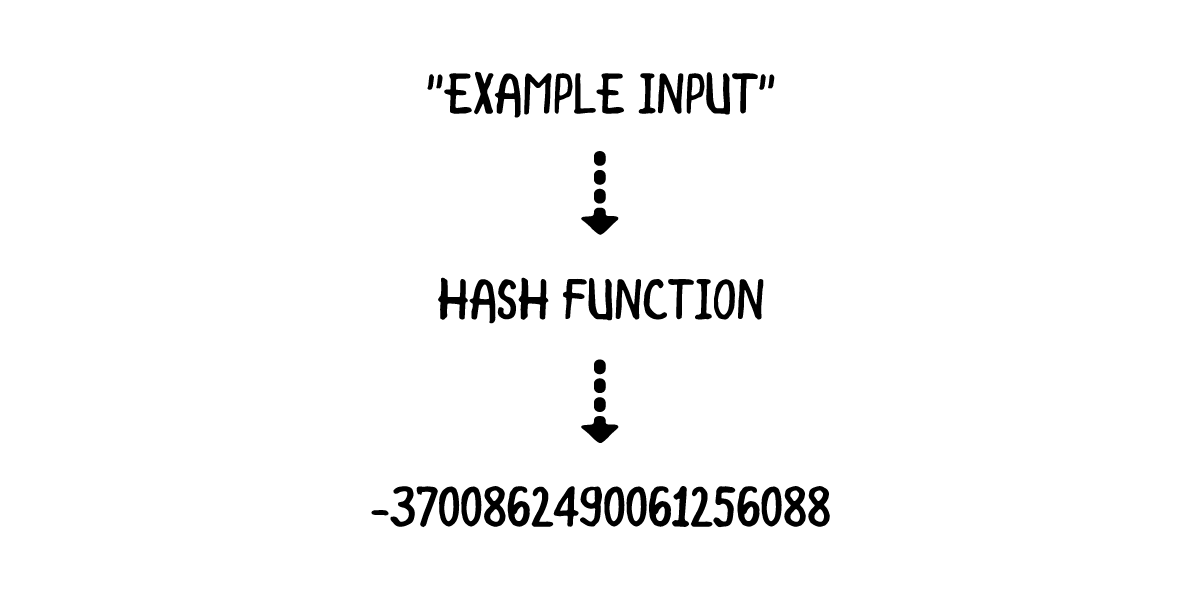
When you write "firstName".hashValue, it returns a big integer: -8378883973431208045. Likewise, "hobbies".hashValue has the hash value 477845223140190530.
Hash values are calculated by a hash function, which takes some input and returns an integer:
To achieve a better understanding of how hash functions work, you’ll implement two simple hash functions of your own. Open up a playground and write the following in the playground page:
func naiveHash(_ string: String) -> Int {
  let unicodeScalars = string.unicodeScalars.map { Int($0.value) }
  return unicodeScalars.reduce(0, +)
}
This above hash function uses the unicode scalar representation of each character and sums it up. Write the following into the playground page:
naiveHash("abc") // outputs 294
While this hash function does map a string to an integer value, it’s not very good. See why by writing the following:
naiveHash("bca") // also outputs 294
Since naiveHash only sums up the unicode scalar representation of each character, any permutation of a specific string will yield the same result.
A single lock is being opened by many keys! This isn’t good. A significantly improved hash function can be obtained with just a bit more effort. Write the following in the playground page:
// sourced from https://gist.github.com/kharrison/2355182ac03b481921073c5cf6d77a73#file-country-swift-L31
func djb2Hash(_ string: String) -> Int {
  let unicodeScalars = string.unicodeScalars.map { $0.value }
  return unicodeScalars.reduce(5381) {
    ($0 << 5) &+ $0 &+ Int($1)
  }
}

djb2Hash("abc") // outputs 193485963
djb2Hash("bca") // outputs 193487083
This time, the two permutations have different hash values. The hash function implementation in the Swift Standard Library for String is far more complicated, and uses the SipHash algorithm. That’s beyond the scope of this tutorial.
Keeping Arrays Small
"firstName" has a hash value of -8378883973431208045. Not only is this number large, it’s also negative. So how do you fit it into an array?
A common way to make these big numbers suitable is to first make the hash positive and then take the modulo with the array size.
In the example earlier, the array had a size of five. The index for the "firstName" key becomes abs(-8378883973431208045) % 3 = 1. You can calculate the array index for "hobbies" is 2.
Using hashes in this manner is what makes the dictionary efficient; To find an element in the hash table, you must hash the key to get an array index and then look up the element in the underlying array. All these operations take a constant amount of time, so inserting, retrieving, and removing are all O(1).
Avoiding Collisions
There is one problem. Taking the modulo of the hash value with a number can lead to a same value. Here’s one such example:
djb2Hash("firstName") % 2 // outputs 1
djb2Hash("lastName") % 2 // outputs 1
This example is a little contrived, but serves the purpose of highlighting the possibility of a hash mapping to the same index. This is known as a collision. A common way to handle collisions is to use chaining. The array looks as follows:
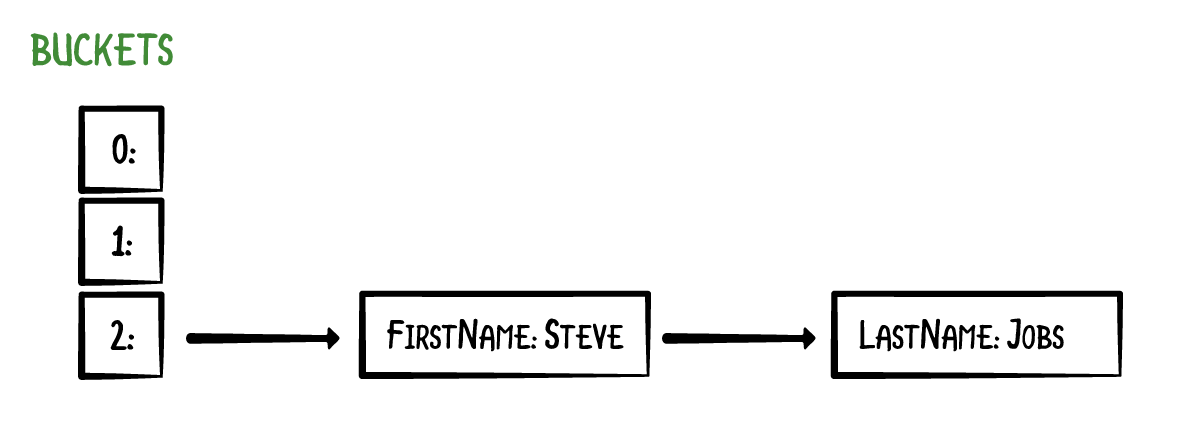
With chaining, keys and their values are not stored directly in the array. Instead, each array element is a list of zero or more key-value pairs. The array elements are usually called buckets, and the lists are called the chains. Here we have 3 buckets, and the bucket at index 2 has a chain. The other buckets are empty.
Retrieving Items
Here’s an example of retrieving an item from the hash table:
let x = hashTable["lastName"]
The hash table first hashes the key "lastName" to calculate the array index, which is 2. Since bucket 2 has a chain, you step through the list to find the value with the key "lastName". This is done by comparing the keys using a string comparison. The hash table checks that the key belongs to the last item in the chain and returns the corresponding value, "Jobs".
Common ways to implement this chaining mechanism are to use a linked list or another array. Chains should not become long because looking up items in the hash table would become a slow process. Ideally, you would have no chains at all, but in practice it is impossible to avoid collisions. You can improve the odds by giving the hash table enough buckets and usin high-quality hash functions.
Implementation
In the Sources directory, create a new Swift file and name it HashTable.swift. Delete any text in the file and write the following:
public struct HashTable<Key: Hashable, Value> {
  private typealias Element = (key: Key, value: Value)
  private typealias Bucket = [Element]
  private var buckets: [Bucket]

  private(set) public var count = 0
  public var isEmpty: Bool {
    return count == 0
  }

  public init(capacity: Int) {
    assert(capacity > 0)
    buckets = Array<Bucket>(repeating: [], count: capacity)
  }
}
Although you created a hash function based on the djb2 hash algorithm, it’s better to leverage Apple’s version. Through the constraining the Key as Hashable, your dictionary enforces that all keys have a hash value, so your dictionary doesn’t need to worry about calculating the actual hash.
The main array is named buckets It has a fixed size provided by the init(capacity) method. You also keep track of how many items have been added to the hash table using the count variable.
Operations
Now that the scaffolding for your hash table is complete, you’ll want to define the mutating operations for this structure. There are four common things you will do with a hash table:
- insert a new elements
- look up an element
- update an existing element
- remove an element
You’ll want the syntax to look like this:
hashTable["firstName"] = "Steve" // insert
let x = hashTable["firstName"] // lookup
hashTable["firstName"] = "Tim" // update
hashTable["firstName"] = nil // delete
Start by defining the following helper method in your HashTable structure:
private func index(for key: Key) -> Int {
  return abs(key.hashValue) % buckets.count
}
This method will help ensure the key maps to an index within the bounds of the storage array. Next, add the following just below index(for:):
Value Retrieval
Write the following inside the HashTable structure:
// 1
public subscript(key: Key) -> Value? {
  get {
    return value(for: key)
  }
}

// 2
public func value(for key: Key) -> Value? {
  let index = self.index(for: key)
  return buckets[index].first { $0.key == key }?.value
}
- The
subscriptmethod takes a key and returns a value. The actual logic will reside in thevalue(for:)method. -
value(for:)first callsindex(for:)to convert the key into an array index. That returns the bucket number, but this bucket may be used by more than one key if there were collisions. Thus, you use thefirstmethod that takes a closure, where you compare the key of each element with the key you want to match it with.If a match is found, you use optional chaining to extract the value. Otherwise,
firstwill returnnil, signifying that the key doesn’t map to a value in the hash table.
Inserting Values
The subscript method can also work as a setter. Add the following code at the bottom of subscript:
set {
  if let value = newValue {
    update(value: value, for: key)
  }
}
This adds a setter to the subscript operation. newValue is a invisible reference to the value that is being assigned to the subscript. Once again, you’ll be defining actual logic in a helper method.
Add the following below value(for:):
@discardableResult
public mutating func update(value: Value, for key: Key) -> Value? {
  let index = self.index(for: key)

  // 1
  if let (i, element) = buckets[index].enumerated().first(where: { $0.1.key == key }) {
    let oldValue = element.value
    buckets[index][i].value = value
    return oldValue
  }

  // 2
  buckets[index].append((key: key, value: value))
  count += 1
  return nil
}
Here’s the play-by-play:
- You first check to see if the value is already inside a bucket. If it is, you update the value at the index
i. - If execution comes to this point, it means the key doesn’t map to a particular value inside the hash table. You then add the new key-value pair at the end of the bucket.
With that, you’re finally able to try your hash table out. Navigate back to the playground page and write the following at the bottom of the playground:
var hashTable = HashTable<String, String>(capacity: 5)
hashTable["firstName"] = "Steve"

if let firstName = hashTable["firstName"] {
  print(firstName)
}

if let lastName = hashTable["lastName"] {
  print(lastName)
} else {
  print("lastName key not in hash table")
}
You should see the following output in the console:
Steve
lastName key not in hash table
Removing Items
The final operation you’ll implement is the one that removes the key. Update the subscript method to the following:
public subscript(key: Key) -> Value? {
  get {
    return value(for: key)
  }

  set {
    if let value = newValue {
      update(value: value, for: key)
    } else {
      removeValue(for: key)
    }
  }
}
Next, add the remove(value:for:) method at the bottom of the HashTable structure:
@discardableResult
public mutating func removeValue(for key: Key) -> Value? {
  let index = self.index(for: key)

  // 1
  if let (i, element) = buckets[index].enumerated().first(where: { $0.1.key == key }) {
    buckets[index].remove(at: i)
    count -= 1
    return element.value
  }

  // 2
  return nil
}
This is fairly similar to the update method. You first check to see if the value is in the bucket. If it is, you remove the key in the chain, decrement the count, and return the value. Otherwise, you return nil, since you couldn’t find the key-value pair to remove.
Navigate back to the playground page and write the following:
hashTable["firstName"] = nil

if let firstName = hashTable["firstName"] {
  print(firstName)
} else {
  print("firstName key is not in the hash table")
}
You should see the following in the console:
Steve
lastName key not in hash table
firstName key is not in the hash table
Resizing the Hash Table
This version of the hash table always uses an array of fixed size or capacity. If you have many items to store in the hash table, choose a prime number greater than the maximum number of items.
The load factor of a hash table is the percentage of the capacity that is currently used. If there are 3 items in a hash table with 5 buckets, then the load factor is 3/5 = 60%.
If the hash table is small, and the chains are long, the load factor can become greater than 1, which is a sign of bad performance. One way to avoid this is to resize the hash table. Adding the code for this condition is left as an exercise for the reader. Keep in mind that making the buckets array larger will change the array indices that the keys map to! This requires you to insert all the elements again after resizing the array.
Where to Go From Here?
I hope you enjoyed this tutorial on implementing a Swift hash table!
Here is a playground with the above code. You can also find the original implementation here.
This was just one of the many algorithms in the Swift Algorithm Club repository. If you’re interested in more, check out the repo.
It’s in your best interest to know about algorithms and data structures – they’re solutions to many real-world problems, and are frequently asked as interview questions. Plus it’s fun!
So stay tuned for many more tutorials from the Swift Algorithm club in the future. In the meantime, if you have any questions on implementing trees in Swift, please join the forum discussion below.
The post Swift Algorithm Club: Hash Tables appeared first on Ray Wenderlich.
Swift Algorithm Club: Hash Tables published first on https://medium.com/@koresol
